Season 4 of Talking Tom and Friends Finale is here!!


We have finally launched the last episode for this season!
I am very happy to be working with such an amazing team with people coming from all around the globe! Also I'm very thankful to all my team, for giving me the oportunity to Lead this aspect of the project (L)

Here is a sumary of all the episodes I worked on:

As Lead Render Technical Director:
S4E26 - https://www.youtube.com/watch?v=6_77CGw9yLE
S4E25 - https://www.youtube.com/watch?v=jUBizaj-dZg
S4E24 - https://www.youtube.com/watch?v=cLtJ-F0Fj9A
S4E23 - https://www.youtube.com/watch?v=DhC8v3ghz2U
S4E22 - https://www.youtube.com/watch?v=FIAfVquKgEU
S4E21 - https://www.youtube.com/watch?v=cyQR0Iz0Uqo
S4E20 - https://www.youtube.com/watch?v=ER085wVbxz0
S4E19 - https://www.youtube.com/watch?v=21xZj2zqhB0
S4E18 - https://www.youtube.com/watch?v=OdI3WlAlZiU
S4E17 - https://www.youtube.com/watch?v=JhM6UIMy440
S4E16 - https://www.youtube.com/watch?v=pKWP5Hl5ETI
S4E15 - https://www.youtube.com/watch?v=Eb4RooyW11M
S4E14 - https://www.youtube.com/watch?v=f2vbxkC3fos
S4E13 - https://www.youtube.com/watch?v=R8N-PKiyGpM
S4E12 - https://www.youtube.com/watch?v=C3A9nVPMiJo
S4E11 - https://www.youtube.com/watch?v=95DI0d2ZBwA
S4E10 - https://www.youtube.com/watch?v=TIZh-Z5tRfw
S4E09 - https://www.youtube.com/watch?v=R_ByP_XAk9o
S4E08 - https://www.youtube.com/watch?v=_vcpgDBzWyc
S4E07 - https://www.youtube.com/watch?v=ShtmFVyC30s

As Render Technical Director
S4E06 - https://www.youtube.com/watch?v=UhYzH0AX04Y
S4E05 - https://www.youtube.com/watch?v=NMnp59svjcU
S4E04 - https://www.youtube.com/watch?v=NweGGxGAb7c
S4E03 - https://www.youtube.com/watch?v=oF3aQHtoCB0
S4E02 - https://www.youtube.com/watch?v=M9nnuY_42cM
S4E01 - https://www.youtube.com/watch?v=qvzH2DFjjUY

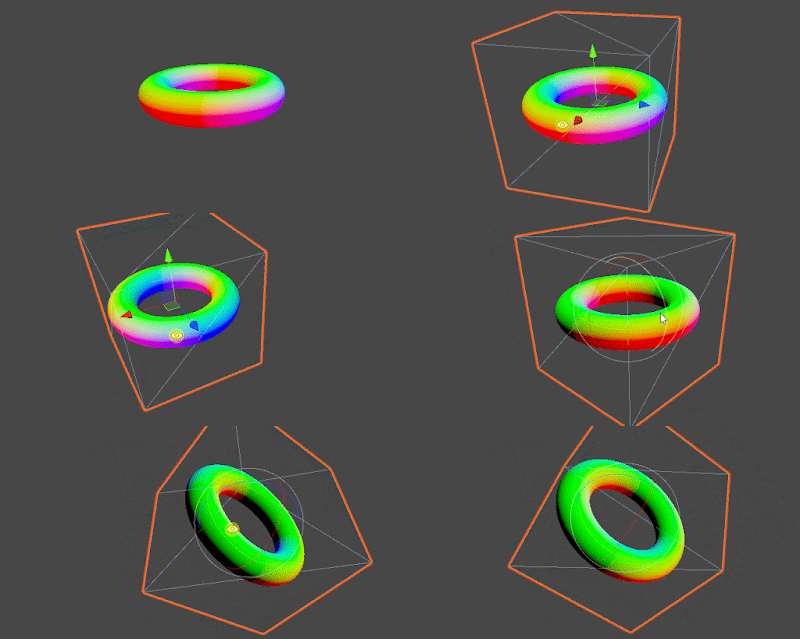
MAYA - First maya plugin in C++


I recently started playing around with C++ the Maya API.
I am not new to Maya, so it hasn't been that difficult to begin this process. The hardest part was probably to change my mindset from Python to C++, and try to find the equivalent functions from one to the other.
Another difficulty I found was to move the gizmo from my first Legacy Viewport implementation (which by the way, it was fairly straight forward) to the Viewport 2.0 classes, which are way wider but less intuitive.

The plugin consists of 3 classes:
  • The Locator Node (shape and transform), which for a given vertex index, a meshShape and a transform node, it outputs the world space transforms of the vertex, and draws a gizmo with the pivot point axis. This transform is calculated by getting the average normal of the vertex and casting a look at function. It takes the Y axis as UP vector so there is an arbitrary roll there, but this can be fixed with a transform rotation offset.
  • The Viewport 2.0 DrawOverride Class, which just draws the 3 lines that represent the pivot point in object space.
  • The Command Class, which essentially passes on the selected object and index to the main class (DG Node Class). It also creates the connections in the DG which are:
    • Out mesh from mesh node to the inMesh of the Plugin DG node.
    • World transform matrix from the mesh to the inMatrix of the Plugin DG node.
    • The out values of the Locator Shape into the Locator Transform.

What was left to do:
  • Adding the offset for the roll and passing the world scale.
  • Getting programatically the world space matrix from the meshShape node istead of getting it from its world mesh plug. I already did this, but it wasn't being called dirty if the mesh was moved. I thing that if I set the meshIn attribute as  setAffectsWorldSpace, this can be fixed.
Anyhow I will add an update in the future and perhaps translate it into a python plugin.
Thanks for reading,


MAYA - Connect Animation Tool


Sometimes in a production environment I have found that procedures were either not followed or not even established in the first place. Many times I have found a lack of a good technical supervision, which ended up leading to many problems further down the line.

Some of the issues I have found in the Animation industry using Maya are:
  • Referenced animation rigs with prefixes instead of namespaces.
  • Wrong distribution of the DAG hierachy.
  • Redundant keyframes
  • Parent constraints that over-complicate an animation.
  • No compatible rig versions for a very same prop.
  • Undesired reference edits in animation files (like shaders/textures overwrites).
Many times reimporting a brand new copy a referenced rig was the quickest solution. For making this task faster and less painful I have put together a bunch of scripts I wrote in the past and re-implemented them in a tool using PySide2 in Maya. The main point of the tool is to transfer animations between referenced rigs.

The tool is fully dockable and remembers position and data between sessions for a given user.
In this video I show how it works. I have already proven it in a production environment and it works nicely, but there is still room for improvement.

For two given referenced rigs, this tool redirects the animation curves from one rig into the other, having in the end both with the same keyframes.

I have added additional options like:
  • Bake: this bakes the animation curves before transferring them, this allows to have parent constraints in the input rig without passing them into the output rig.
  • Color feedback: it will tell you which controls are compatible.
  • It automatically creates a key at the firt frame of a given control if it has no keyframes at all (for when someone forgets to add a key but yet modifies any transformation value).
  • Optimize: deletes reduntant keys, for when several keyframes in a row have the same value (like after baking an animation). This can take a long time for big scenes with complex animations, so I will have to refactor the script.
  • Use long name: sometimes two same maya objects have the same short name due to a bad workflow with namespaces and DAG. This allows to overcome this issue.
  • It automatically bypasses whether the input/output have a prefix isntead of a namespace. The tool will just detect it and make the necesary string manipulation to copy the animation.
  • It has a progress bar which allows the user to cancel the process by pressing the Cancel button.
This was a great practice for me to learn the PySide2 library and extend some of its classes.

Kind regards,

Plotting a function in openGL


I remember being intrigued back in the day about how did the Graph Plotter node in Unreal Engine worked.
I always saw that due to the uneven UVs aspect ratio it created glitches, stretching the plotting line.
This is obviously a minor issue, but I tried to research how to avoid this.

It turns out that using the gradient of the function can fix this, because it creates a "height map" following the line of biggest grow.
The maths behind this require a good background in algebra and it is very nicely explained in the following link at Iñigo Quilez website (a great source of computer graphics knowledge).

https://iquilezles.org/www/articles/distance/distance.htm

He also implemented it very nicely in this link:
https://www.iquilezles.org/apps/graphtoy

I will have a look in the future at filly implementing this in Unity.

Have a great rest of your day,

UNITY - Gerstner Waves in Unity


I have implemented a Gerstner system in Unity. This was done with the help of several tutorials I found on the internet. I am quite happy with the result. I guess the next step is to add a proper water shader!

The waves are generated in the shader directly and it supports up to 3 waves added together.
Another thing I would like to have a look in the future is to calculate this in the CPU and movingthe verteces directly in the CPU.

Kind regards,

UNITY - SDF in Unity


So just to continue with my SDF and Ray marching adventure I implemented it inside unity, using a very similar shader. This was done with the help of all the great people on theinternet!


Gerstner waves


A few months ago I was interested in recreating the Gerstner algorithm to recreate ocean waves in without going into fluid simulation.

To undestand it better I decided to start with graphing it in Desmos, and so I did.
Gerstner waves are parametric functions, which means that the function's x and y depend both on a third parameter, which in our case is goning to be time.


The parameter t is time, k is a constant related to the wavelength and c is another constant that involves gravity. Finally a is another constant that regards the steepnes of the wave, or how sharp they are.

Here you can find two different Gerstner waves with different values of k, c and a.
The blue curve is the result of the addition of the previous two. You can see that the blue one get it's highest crest when the black and the orange are as aligned as they can be. This is a clear example of  the constructive and destructive interference properties of waves.


As a final exarcise I tried to find the tangent and normal vectors for a given point along the curve, which can be acomplished by getting the derivatives of those funcitons at a ceratin point:


Have a great rest of your day,


Season 4 of Talking Tom and Friends Finale is here!!

We have finally launched the last episode for this season! I am very happy to be working with such an amazing team with people coming...